Tutorial: The Layer Gallery
One of the more underused areas in Xara is the
Layers Gallery. I suspect that is because, if you are like me, you are not very well organized and only think to use Layers when it is too late to do so.
When I speak of layers, by the way, I am not referring to our feathered friends in Tutorial 1, aka layers (of eggs) - although it is a good example of using layers - but of stacking one object atop another in a series of
named layers.
Named layers are an efficient way to organize a complex drawing and offer many advantages to us untidy users. To highlight a few,
the Layer Gallery lets you make selected layers invisible and non-editable. This enables
you to focus on a certain part of a drawing without stumbling over, and/or accidentally modifying, objects on the other layers - so if you want to lock objects on the page, then
named layers are the way to do it.
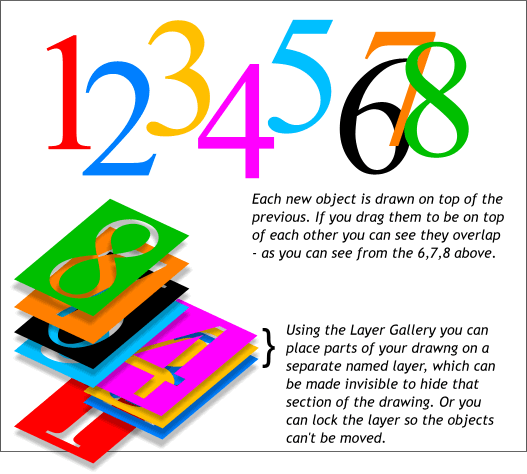
When you draw each new object it's placed on top of the previous, so there is
a type of automatic layering of all drawings. But you can group collections of
objects together and place them on a named layer that's controlled by the
Layer Gallery.
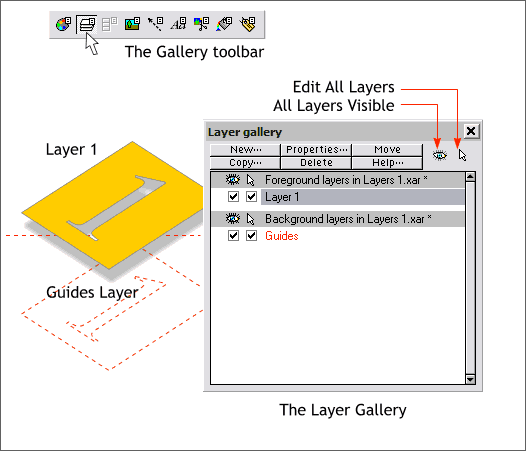
The Layers Gallery icon is represented on the Gallery Toolbar by the three stacked white rectangles. Click this icon to open the Layer Gallery or press F10.
The default layer, Layer 1, is where everything we place on the page
normally goes. You can create new layers as required and choose which is the
active layer. The above diagram shows Layer 1 is the active layer because its
name is highlighted.
(If you use guidelines then you'll find a Guides layer too. By default the Guides layer is shown on top,
but if you prefer to have the guidelines below the objects (as shown above) you can simply drag it below the Layer 1.
You can also place objects on the Guides layer in which case they become red dashed outlines and have the same 'snap to' properties of guidelines.)
The two icons in the upper right area, the eye and the arrow pointer, make all layers visible or invisible and lock or unlock all layers.
Objects on a locked layer cannot be edited, intentionally or accidentally.
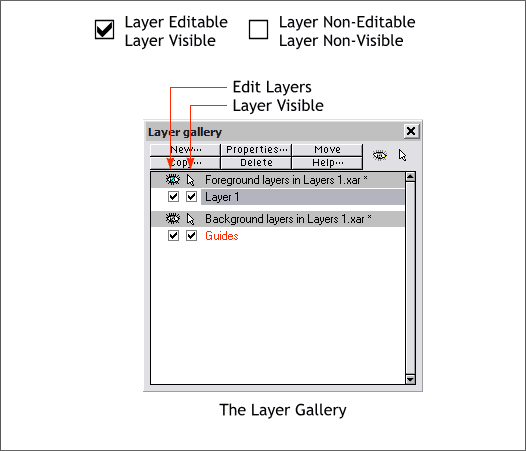
Each layer also has individual check boxes to enable and disable editing and for making the entire layer visible or invisible.
So to lock all the objects on a layer, just un-check the arrow check box for the
required layer.

The New... button creates a new layer which you can name and upon which you can place an object or objects. You can also rearrange the layers by clicking on their names and dragging them up or down. Copy...
copies the contents of the current layer onto a new duplicate layer. Move moves a selected object or objects to the currently selected layer.
The active layer is indicated by the highlighted name. You can change the
active layer but just clicking on its name in the Layer Gallery. It is important to know which layer is the active one when you are working with many
layers. All newly drawn objects are always placed on the active layer.

I created the map above for a website I manage. Because there were a lot of elements, using layers enabled me to work with just a few of the map elements at one time. Each of the lots is a separate object and so I can easily
select an individual lot and change the color to indicate the status.
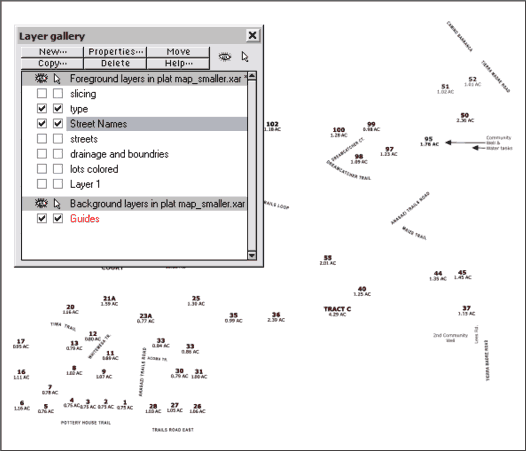
Here is the map with only the street names and type layers visible. The Layer
Gallery shows the 'Street Names' layer is the active layer and that one it
and 'type' layer are visible and unlocked. All other layers are invisible and
locked. See how much easier this makes it to select the street names, now that
most of the rest of the drawing is hidden?
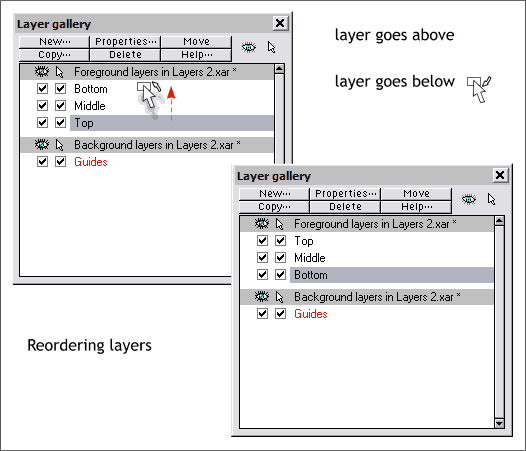
Finally, layers can be reordered by dragging the layer's name up or down. When you drag a layer's name, the cursor changes to a pointer with a white
rectangle and a smaller arrow. If the arrow is pointing upwards, the layer will go above the location of the cursor. If the arrow is pointing downwards the layer will be placed below the location of the cursor.
When you adjust the position of a layer this way, all objects on that layer
are re-positioned, forwards or backwards, in your drawing.
To move objects from one layer to another, you can either select the object
and use the options under the Arrange menu to move the object to the layer in
front or behind. Or you can just cut the object, switch to the new layer by
clicking on its name in the Layer Gallery and pasting.
Based on a tutorial by Gary Priester in The Xara Xone
| 
