|
|
» Index » Tutorial 1 - Optimizing / Resizing / Converting formats (Beginner) » Tutorial 2 - Layer blending and cutting out shapes (Beginner) » Tutorial 3 - Cut outs - object blending - photo blurring (Intermediate) The Outsider's Featured Tutorials are selected from a variety of sources included the best tutorials from the impressive archive on The Xara Xone (created by Gary Priester), Guest Tutorials submitted by Xara enthusiasts and new material created by Xara. Layer blending and cutting out shapesA common practice in Adobe Photoshop is to copy a layer, then perform an operation on the new layer, and then adjust the layer blend to control how much the effect is applied to the original.You can do much the same thing in Xara Xtreme, except that you do not have to use layers, and it's much more direct. Here's a rather poor reproduction of a famous old poster.  If you want to make a monochrome version in Xtreme just click the 'white' color on the color line. This converts the selected bitmap into a black & white image (or will contone to any color you click on).  But if you want to adjust the mix of the black and white version with the original this can be done by just cloning the bitmap to be directly on top of itself, then adjusting the transparency of the top version. So as you adjust the transparency, you get a live screen update varying the saturation between the original full color and the overlaid black & white version. To do this for any photo:
Cut-outsYou may require that parts of your photo are cut out. In this example Lord Kitchener has been cut out from the background, so he can now be placed on any background, or just a plain white one as shown below. Once cut out of the background you can treat each part of the photo as a separate object and treat each part separately e.g.  The process of cutting objects out of photos involves drawing around the shape on the photo. Cutting shapes out of Photos
In this case the line being drawn is shown in blue (shift click on the color line to set the line color to be a contrasting color. Set the line width to a suitable value so you can easily see the line). 
Finish by making the final click on top of the first one. You now get a filled shape (it will becomes filled with color). You can just click the 'no fill color'  patch on the color line to remove the fill. patch on the color line to remove the fill.
Tip: While clicking each new point, typing L will make the next segment a straight line, Typing C will make it a curve, so it's easy to toggle between curves and straight line segments as you go. Tip: If you draw a straight line segment, it's really easy to change any previous segment to a curve - just drag on the straight line, and it bends the line. So a lot of people draw outlines using straight line segments and just drag on the lines as required to bend them where a curve is required for a better fit. But for examples such as the gentle curve around Kitchener's cap, then using curve mode and clicking a reasonable distance apart produces a nice smooth curve. One you've completed drawing around the shape you'll have a solid fill like this 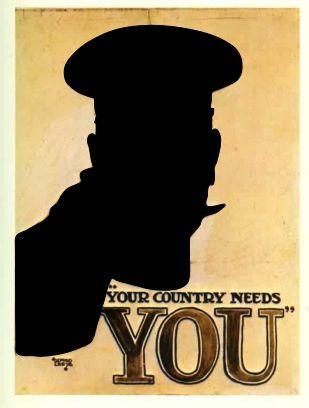 Now just select the underlying photo at the same time as the shape (so both shape and photo are selected). Assuming the drawn shape is still selected this just requires a Shift+Click on the photo. The status line should say 2 objects selected. Select the menu Arrange -> Combine Shape -> Intersect Shapes, or just press Ctrl+3, and you'll end up with this:  You end up with a normal vector shape that contains a bitmap fill made from the photo. You can treat this like any normal object, and apply different effects. Here it's been given a soft shadow to lift it off the background, and it's also been given a contone color.  Tip: To color a bitmap that's inside a shape as a fill, like these, you can't just click a color (that will fill it with a solid color). Instead select the Fill tool and you'll see the fill arrows that represent the extent of the photo in the fill. Select either the end handles or the center handles and then click a color on the color line - this will set the light or dark color of the contone. In this case the light color is a pale green. 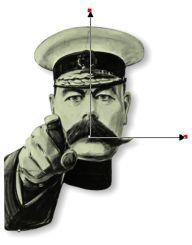 Click here for another more advanced example using these techniques. |