
|
|
» Index » Tutorial 1 - Optimizing / Resizing / Converting formats (Beginner) » Tutorial 2 - Layer blending and cutting out shapes (Beginner) » Tutorial 3 - Cut outs - object blending - photo blurring (Intermediate) The Outsider's Featured Tutorials are selected from a variety of sources included the best tutorials from the impressive archive on The Xara Xone (created by Gary Priester), Guest Tutorials submitted by Xara enthusiasts and new material created by Xara. Optimizing / Resizing / Converting formatsYou may have photos in formats such as BMP or PNG, and want to convert them to JPG for use on the web; or you may just have a huge image that you need to reduce to make the file as small as possible. These are really easy in Xara Xtreme.Step 1 - import the fileThe easiest way to do this is to just drag the file from your File Explorer onto the Xtreme Window.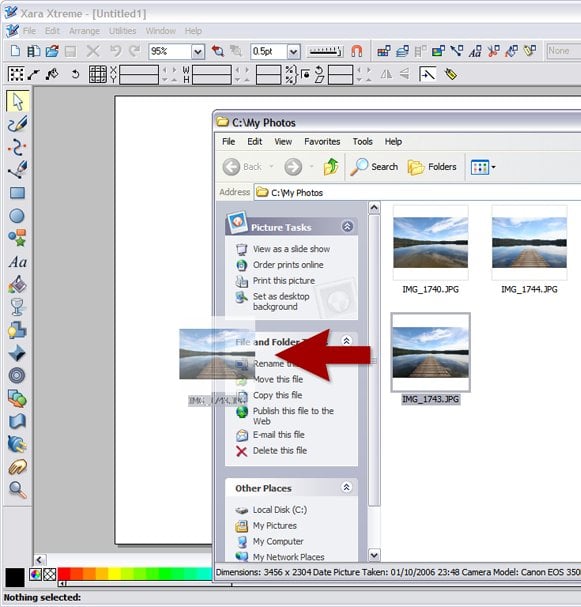
Tip: If you drop the file on the title bar, it will open in a new document. If you drop it on the main window it will just import it into the current document. Step 2 - resizeThe imported photo will typically be too large. So in order to reduce it to a reasonable size you will typically have to zoom out to see the whole image. Just click the zoom to fit icon on the top bar, so you
can see the whole image. Now in the Selector tool, just drag one corner inwards to resize it. (Tip: if you hold Shift
it will resize around the center of the image). zoom to fit icon on the top bar, so you
can see the whole image. Now in the Selector tool, just drag one corner inwards to resize it. (Tip: if you hold Shift
it will resize around the center of the image).
If you know the size you require in pixels you can just type this into the Selector tool InfoBar in the W (width) field. Eg. just typing 500pix into the W field will resize the image to be 500 pixels wide. 
Tip: Useful sizes in pixels are...
Step 3 - optimize and saveMake sure your photo is selected and choose the File -> Export menu option (or just Type Ctrl+Shift+E). This displays the first export dialog where you can select the file type and filename.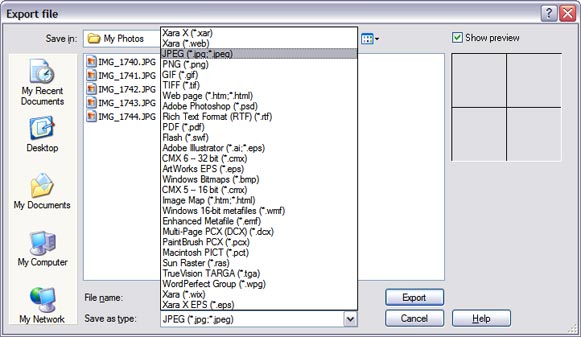
From the 'Save as type' drop down menu select JPEG - this is the file format that should be used for almost all graphics used on the Web. Although the other main format that can be used is PNG. Tip: JPEG images should be used for all photos if you want to use them on the web or send them in an email to someone. PNG format is the other common format that is recommended for line-art, and non-photograph artwork. Tip: JPG and JPEG are interchangeable - they both mean the same thing and are pronounced 'jay-peg'. When you've entered your filename and clicked Export the second dialog appears, which is where you can optimize the image quality and file size. 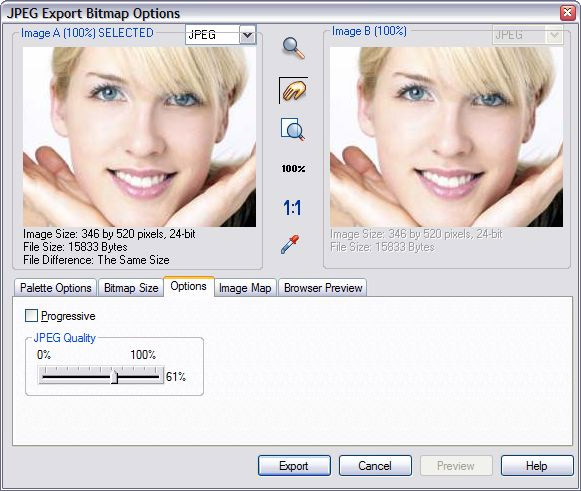
The export dialog shows you two preview windows - you can push the image around inside the windows. This shows you the actual size the image will be saved. There are various tabbed controls, of which the Option tab (shown above) is probably the most important for saving JPG. The quality slider adjusts the relationship between file size and quality. The higher the quality setting, the larger the JPG file. As you adjust the slider one of the preview windows is updated - the left one normally. You can see above that key information is under the active preview window. In this case the image is 346 pixels wide, and the file is 15,833 bytes large (approx 15KB), and the image quality setting is at 61%. The reason for two preview windows is so that you can compare different settings side by side. So click the right hand image, and now adjust the quality settings. 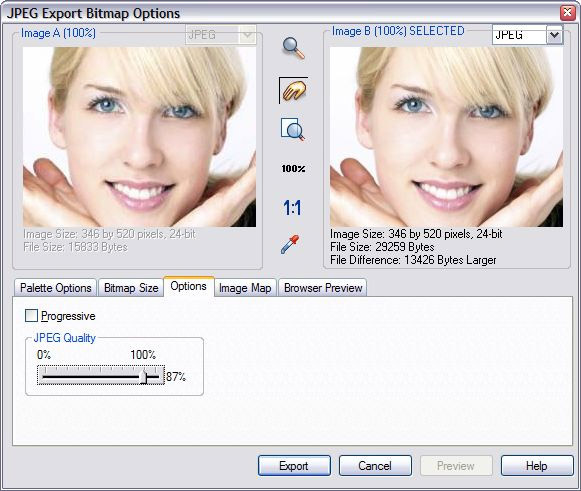
In the above example the right preview window is enabled and the quality set to 87%. You can see the resultant JPEG file is 13,426 bytes larger, and yet there is no discernable difference in the quality of the preview image. And this is an important lesson: JPEG quality is perfectly good at a 75% setting or less. The file size saving can be very significant - and that's important for web use or just when emailing pictures to someone else. Tip: Do not export JPEG images at 100% quality - the file sizes will be huge and the resultant image quality not visibly better. The recommended value for typical use is 75%. You can take it lower to produce perfectly good, size optimized images for web use. Tip: When you reduce hi-resolution images by a large amount you sometimes see jaggy edges to images in the main Xtreme window. When exporting, Xtreme renders the image in a much higher quality mode (technically it performs a bicubic sampling), so your exported images are always exported at maximum quality. 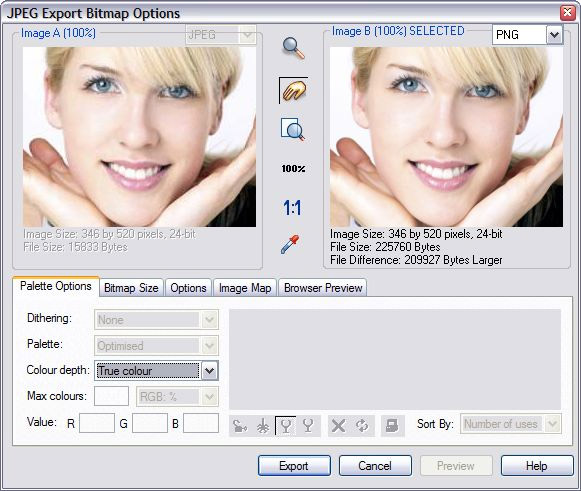
Finally the above example has the right hand image set to export as PNG file type - you can do this by selecting file type from the drop-down menu to the top right of the preview. And here you can see just how good JPEG file types are compared to PNG. The PNG file is more than 200KB larger than the JPG for no visible improvement in quality. When you're happy that you have the optimum file size and quality, just click the Export button to save the file to disc. |
