Tutorial: Chrome Studded Sphere, by Gary Priester
I recently had occasion to create a studded sphere for an image I was drawing. I used an old technique which you older users will be familiar with involving the use of the Mold Tool and edited Circular envelopes. I then took advantage of Xtreme's new Live Effects Tool to apply the Eye Candy 4000 Chrome effect. And I even found a way to expedite object selection using the Name Gallery. This tutorial should be appropriate for users of all levels. New users will get a good tour of Xtreme and old users can reacquaint themselves with some old and some new techniques.
NOTE:
You will notice from time to time I apply arbitrary colors to objects. I do this to make the objects easier to see. If I do not specify a fill for an object, you do not have to apply a fill or outline color.
When I show an ellipse or rectangle that has just been created, that has no fill, it is because I have set the fill to none before I exported the illustration. By default, all ellipses,
rectangles and Quick Shapes have a black outline and a black fill. There is nothing wrong with your copy of Xara Xtreme.
Naming Conventions. I use bold face
to indicate the names of tools, galleries, keyboard shortcuts, and dialogs. Items such as unnamed icons and drop down lists, which have names when you let your cursor rest over them for a moment, are displayed in italics.
The Infobar is the context sensitive menu at the top of the screen and changes to reflect the options for the selected tool.
We will be using Pixels as our units of measure. Right click on the screen and select Page Options... from the pop up menu. In the Units tabbed section, select Pixels
for the Units and 0-255 for the Color Units. In the Grid and Ruler tabbed section set the Major Spacing to 100pix (key it in exactly like this please) and the Number of Subdivisions
to 10. Press OK to close the dialog and apply the changes.

Select the Rectangle Tool (keyboard shortcut Shift F3). Hold down the Ctrl key to constrain the rectangle to a square and drag a 150 pixel square. (You
can see the size as you draw on the Infobar at the top of the screen).
Don't worry if your square is not the exact size. Just enter the correct dimensions in the Width and Height text entry boxes and press Enter.
Click the orange magnet icon on the Infobar to enable Snap to Objects. Select the Shape Editor Tool (F4) and click in the top left corner. Click again in the
lower right corner to create a diagonal line.

With the new diagonal line selected switch to the Selector Tool (F2) it's the arrow the pointer tool, hold down the Shift key (to scale selections from the
center out) and drag the lower right control handle (the small black square) so the diagonal line is wider than the square as illustrated above.

Clone the diagonal line (Ctrl k). Click the Flip Horizontally icon (the two upright triangles) on the Infobar at the top of the screen. You should now have a
square and two diagonal lines as shown.
Hold down the Shift key (to select multiple objects) and click on each of the diagonal lines. Press Ctrl g (or select Group from the Arrange menu).
NOTE TO NEW USERS: Xtreme has 2 ways to make a duplicate. Edit > Duplicate or keyboard shortcut Ctrl d creates a duplicate and offsets the duplicate usually down and to the right 20 pixels. Edit
> Clone or Ctrl k places the duplicate directly on top of the original. In addition you can Edit > Copy and Edit > Paste to create a duplicate. Edit > Paste
places a copy of contents of the clipboard in the exact center of the screen. Edit > Paste in Place or Shift Ctrl v pastes the duplicate in the exact position from which it was copied.

Using the Selector Tool (F2), drag a selection rectangle around the grouped lines and the square. This is called a "marquee selection". From the Arrange menu, select
Combine Shapes... Subtract Shapes or use the keyboard shortcut Ctrl 2. The two diagonal lines will disappear.
With the square selected, select Arrange > Break Shapes. You now have 4 individual triangles.

Marquee select the 4 triangles and on the Infobar, change the W or H value to 60 and press Enter to apply the change. If the square only changes size
horizontally or vertically, enter 60 in the other text entry box and press Enter again.
Right click on the page and select Page Options... In the General tabbed section change the X Duplication Distance to 60pix and the Y distance to 0. Press
Apply to make the temporary change.
Change the Nudge Size (the distance a selected object is moved when you press one of the arrow keys) to 1pix.

Marquee select the 4 triangles and press Ctrl d (as in duplicate) 4 times. Each duplicate will be offset 60 pixels to the right evenly spacing the 5 sets of triangles.
Change the X Duplication Distance to 0 and the Y Duplication Distance to -60pix and press Apply to make the change.

Marquee select the 5 sets of triangles and press Ctrl d 4 times to add 4 duplicates below the first 5 sets.
Set the duplication distances back to their original settings of 20 and -20 and press OK to save the changes and close the Page Options dialog.
Select all the triangles shown above in yellow and left click on the Yellow square on the screen palette to apply yellow as their fill color. Color the other
triangles as shown using the colors shown above.
TIP: Marquee select the top row of triangles, then hold down the Shift key and marquee select the other rows of triangles to be colored yellow and apply the fill one time.
Make a copy of one square (yellow, orange, red and purple triangles) and set it to one side. You will need it later on in the tutorial.

Add a vertical line parallel to the left set of triangles. Press the left arrow key 30 times to move the line to the left 30 pixels.
TIP: Hold down the Shift key when you click and you will only need to click 3 times instead of 30. The Shift key moves the selection 10 pixels at a time.
TIP: To draw a vertical, horizontal, or angled line in Xtreme, click the Shape Editor Tool (F4) once on the page, hold down the Ctrl key, then click and
drag the end of the line in the direction you want it to go.
Add a duplicate line to the right also spaced 30 pixels.
TIP: Drag the line to the right holding down the Ctrl key to constrain the movement to horizontal. When you reach the other side of the colored squares
, click the right mouse button to drop a duplicate line. This is called drag and duplicate.
Select the Blend Tool (F7). Click on the top of the left line and drag the cursor to the top of the right line to create a 5-step blend.
With the blend selected, from the Arrange menu, select Convert to Editable Shapes. Then from the Arrange menu, select Ungroup or press Ctrl u.

Delete the first and last lines. Move the lines to the distances shown above using the arrow keys. If you set your Nudge distance to 1pix in the Page Options dialog, the lines will move one pixel per click.

Select the 5 lines and using the up and down arrow keys, move the lines up or down until the center of the lines is aligned with the center of the third row of
triangles. With the five lines selected, press Ctrl k (Clone). Enter 90 in the Angle of Selection text entry box on the Infobar (shown highlighted in yellow above) and press Enter
to rotate the lines.

Drag a guideline onto the screen from the screen rulers (Ctrl L to display rulers). The guideline does not need to be near the triangles. I'll explain the need for this in a moment.
Select all 10 lines and group them (Ctrl g) and then Cut them to the clipboard (Ctrl x or Edit > Cut).
Open the Layer Gallery (F10) and click on the title bar for Guides. From the Edit menu, select Paste in Place or press Shift Ctrl v, to place the lines on the Guides
layer. The lines will now appear as dashed red lines and will have the same snap to effect as a guideline.
NOTE: When you drag a guideline onto the page, Snap to Guidelines is automatically enabled.
Select Layer 1 by clicking its title bar and press the X on the top right to close the gallery.
NOTE: The reason we dragged a guideline onto the screen is to make the Guides layer available. If there are no guidelines on the screen, the Guides layer will not appear.

Think of this next step as a Zen mind relaxing exercise. Select each triangle first with the Selector Tool (F2) and then switch to the Shape Editor Tool (F4
). Drag the appropriate control points for each triangle to the intersection of the guidelines as shown above in 4 steps. Move on to the next 4 triangles
and repeat. Continue this relaxing exercise until all the triangles have been arranged or until you achieve Satori.
TIP: Press the Space Bar to toggle back and forth between tools. This works with every tool but the Text Tool.
After you have modified all the triangles, save your drawing and take a well deserved short eye break.

When you have competed this pleasant and relaxing exercise, your drawing should look like the one pictured above. Marquee select all of the triangles (if there is nothing else on the page, you can use
Ctrl a or Edit > Select All. Right click the cross hatched box to the left of the screen palette to set the outline Width to none.

Select and Delete the guidelines you pasted onto the Guides layer.
Add 4 new guidelines, one for each side as shown.
In this next step we will apply a series of Circular Envelopes with the Mold Tool to change the square group of triangles into a spherical shape.
In case you're the curious type and are wondering why the need to make all those modifications to the triangles, all will be revealed in a moment.

Marquee select all of the triangles or use Ctrl a. Switch to the Mold Tool (Shift F6). Click the circle icon (Circular Envelope) on the Infobar. This gives
the triangles a quasi spherical look. Zoom in close to the circular shape and drag 4 new guidelines through the 4 tiny boxes (the control handles) on the envelope.
NOTE: The triangles now appear to be pointing in a variety of outward directions. This is what all the modification of the triangles was for.
While the objects sort of look like a sphere, we need add another Circular Envelope to make the sphere more convincing. But don't do it just yet.
With the enveloped shapes selected, Arrange > Convert to Editable Shapes. This removes the ability to edit the Envelope with the Mold Tool options.

With the circular shape and the Mold Tool selected, apply a new Circular Envelope.

Click the Mold Tool cursor on the top left control point. 2 gray lines with tiny red squares will appear. These are called Bezier Curve control handles. Drag
the 2 red square control handles to the intersection of the guidelines as shown above top left making a V-shape.

Repeat the last step and drag the other 3 sets of Bezier control handles and snap them to the intersection of the guidelines as shown.
TIP: Zoom in close (drag a marquee around the shape with the Zoom Tool�the magnifying glass tool) to the shape. This will make editing easier and snapping to the guidelines more accurate.
Now the sphere is more sphere like.

Find the copy of the 4 triangles you set aside earlier in the tutorial.
Select the yellow triangle. Select the new Live Effects Tool (Ctrl F5). Click New and scroll down to the Eye Candy 4000 Demo or the Eye Candy 4000
series if you have purchased all of the effects, and select Chrome.
NOTE: Chrome is one of the free filters included with Xara Xtreme. There are lots of really cool filter effects in this and the other series. If you want to
acquire the entire set, or see examples of all the filter sets, click here.

Select Blue Sky from the Reflection Map drop down list. Move the Bevel Width slider to 80% and press OK to apply this effect. The chrome effect will
be applied and should look like the example above.
For more information on the Live Effects Tool see our other tutorial this month.

Apply the other reflection maps shown above to the other 3 triangles and set the Bevel Width slider setting to 80% for each one.
These effects are called "Live Effects" because you can go back and edit any effect. Even after the document has been saved. In addition you can add more than one effect per selection. And you can go back and edit any or all
effects which is what we must do here because I forgot to have you edit the Bevel Type.
Select any of the triangles with the Live Effects Tool (Ctrl F5). Click the Edit button on the Infobar and go to the Bevel Profile tabbed section. From the list select Flat
. Repeat this editing step for the other 3 triangles.
Save your drawing and take a short break.

You can copy some live effects, such as Chrome (possibly all, I have not tried this yet) and Paste Attributes onto another object such as our spherical shape
. But I know if I asked you to do this for all 100 shapes, I would never hear the end of it. (One Zen meditation exercise per tutorial is enough). So a
brilliant idea struck me. OK actually I bumped my head on the door frame and pretended it was a thought striking! Why not see if I can select all the yellow shapes at one time using the Name Gallery. And it worked!
Select the top triangle, the one with the Blue Sky effect. Copy it to the clipboard (Ctrl c). Open the Name Gallery (click the yellow tag icon on the Infobar). Scroll down to the Used Colors
section (shown above) and click the open circle next to the color Yellow. This select all of the yellow shapes with one click (clever, no?)

From the Edit menu, select Paste Attributes or press Shift Ctrl a. Is that cool or what?

Copy the next triangle to the Clipboard. Select the corresponding color in the Name Gallery and Paste Attributes. Repeat this step for the other two colors.
The Name Gallery just saved us 96 steps.

Next we'll create a circle which we will use to give the studded chrome sphere some shading.
Using the Ellipse Tool (Shift F4), and holding down the Ctrl key to constrain the ellipse to a circle, create a 270 pixel circle. Select the circle with the Fill Tool (F5
). From the drop down list of Fill Types, select Circular. Drag the center of the fill upwards as shown above and change the colors to 30% and 80% Black.
Click the Profile arrow on the Infobar and from the drop down list, select Profile 2. As you may have noticed, this accentuates the difference in the two colors.

Before we go any father, marquee select all the elements on the chrome sphere and group them Ctrl g or Arrange > Group). Do not add the circle you just created to the group however.
TIP: Cut the circle with the circular fill to the Clipboard. Group the objects for the chrome sphere, then Paste the sphere back onto the page.
Center the circle over the studded chrome sphere.
Select the circle with the Transparency Tool (F6). Apply a Flat, 0%, Brightness transparency (select Brightness from the drop down list of Transparency Types).
You may have noticed a slowdown in redraw time with all these chrome effects. To speed things up, select the circle and the chrome group and Arrange > Create Bitmap Copy... Leave the Color Depth as is and in the
Bitmap Size tabbed section, set the Resolution to 300dpi. Delete the other objects unless you're sentimental in which case save your drawing and then
delete all but the bitmap and save your drawing again with a new name.

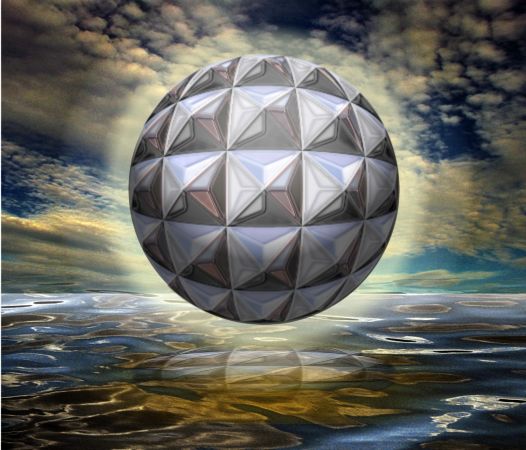
The last step is to create a background over which to float the studded chrome sphere.
Create 2 rectangles to the sizes shown above and let the middle edges overlap some as indicated above with the red dashed lines.
Select the top rectangle. Open the Fill Gallery (Shift F11). From the Non Repeating Color Fills section, select Sky and press Fill. Switch to the Fill Tool (F5
). 2 connected arrows will appear. Click on either of the small boxes at the end of the arrow and then press and hold down the left arrow key to scale down the fill until the width just fills the rectangle.
Apply Ripples 2 from the same folder to the lower rectangle and resize it using the same process just covered.
TIP: You can also drag any of the fills from the gallery and drop them onto an object to apply the fill.

The line where the water meets the horizon is too sharp. To soften this, select the bottom rectangle with the Transparency Tool (F6). Click and drag
upward as shown above to soften the edge. The rectangle with the Sky fill should extend down and behind the bottom rectangle about 40 pixels or so.
TIP: To constrain the angle of the transparency to vertical, hold down the Ctrl key while you drag.

Center the bitmap of the sphere over the image. Clone the bitmap (Ctrl k).
Drag the clone down below the original bitmap and drag the top center bounding box control handles downwards to squash the circle into a wide ellipse as shown.

Select the squashed bitmap and add about 8 pixels of feathering to soften the edges. The Feathering slider is in the top right area of the Infobar.
Click on the flattened bitmap with the Transparency Tool and drag down and beyond the bottom edge to create a Linear transparency and to add a reflection in the water.

Select the round bitmap with the Shadow Tool (Ctrl F2). Click the Glow Shadow icon on the Infobar. Drag outward on the glow with the Shadow Tool
until it extends out from the sphere a small amount. Change the slider settings as shown.
The default red glow does not work with the cool colors of the drawing. No problem. Drag the pale yellow color from the on screen color palette (it's about
3/4 of the way to the end of the colors so you'll need to scroll the colors) and drop the color onto the glow. If you drop it onto the bitmap just press Ctrl z (undo) and try it again.
And that's it. Just about.
As you know I can never leave well enough alone. I have made some small modifications including an orange glow around the reflection.
Duplicate the sky and water rectangles and make a True Color bitmap of the two rectangles. (Delete the two duplicate rectangles afterwards). Apply a Circular, Stained Glass
transparency to the bitmap and reverse the slider settings for the transparency (100% in the center and 0% on the outside). Drag the center of the transparency over the center of the sphere and add a Profile 2 profile.
Select the bitmap sphere (Alt click on the transparent bitmap 2 times) and bring the bitmap and glow to the front (Ctrl f). And now we're finished!
�2006 Gary Priester from the Xara Xone
| 
