Tutorial: Beary Potter, by Gary Priester
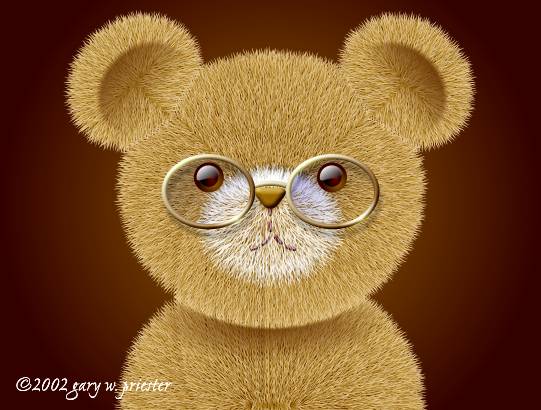
Inspired by the popular children's books, this month we will make creative use of Xtreme's Contour Tool and Custom Brush Stroke capabilities to create ad plush stuffed teddy bear, Beary Potter. It is a fun tutorial and one that I think users of all levels will be able to handle. So bear with me and we'll build this adorable little teddy bear.
NOTE:
You will notice from time to time I apply arbitrary colors to objects. I do this to make the objects easier to see. If I do not specify a fill for an object, you do not have to apply a fill or outline color.
When I show an ellipse or rectangle that has just been created, that has no fill, it is because I have set the fill to none before I exported the illustration. By default, all ellipses,
rectangles and Quick Shapes have a black outline and a black fill. There is nothing wrong with your copy of Xara Xtreme.
Naming Conventions. I use bold face
to indicate the names of tools, galleries, keyboard shortcuts, and dialogs. Items such as unnamed icons and drop down lists, which have names when you let your cursor rest over them for a moment, are displayed in italics.
The Infobar is the context sensitive menu at the top of the screen and changes to reflect the options for the selected tool.
We will be using Pixels as our units of measure. Right click on the screen and select Page Options... from the pop up menu. In the Units tabbed section, select Pixels
for the Units and 0-255 for the Color Units. In the Grid and Ruler tabbed section set the Major Spacing to 100pix (key it in exactly like this please) and the Number of Subdivisions
to 10. Press OK to close the dialog and apply the changes.
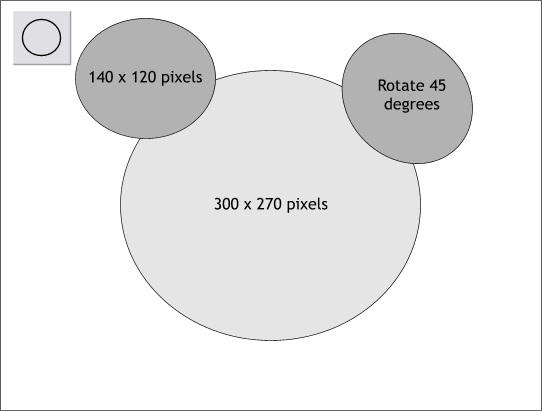
Using the Ellipse Tool, draw two ellipses to the sizes shown above. Rotate the smaller ellipse 45 degrees anti-clockwise as shown on the top right.
TIP: Drawing an ellipse to the exact size is not easy. Draw an ellipse and then with the ellipse still selected, enter the desired sizes in the Height and Width text
entry boxes on the Infobar at the top of the window. Press Enter to apply the changes.
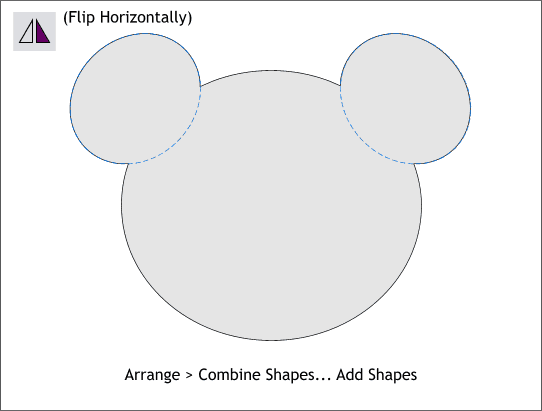
Clone (Ctrl k) the rotated ear and flop it by pressing the Flip Horizontally icon on the Infobar. Position both ears as shown. Make a duplicate of all three ellipses (Ctrl d
) and place the duplicate to one side. We will need them later in the tutorial.
Select the original three ellipses and from the Arrange menu select Combine Shapes... Add shapes. This combines the three ellipses into one shape with a single outline.
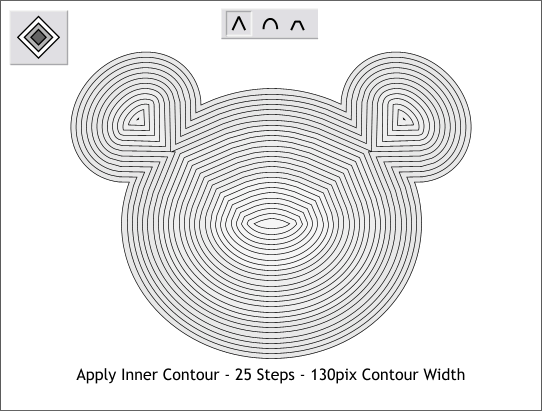
Select the Contour Tool then click on the outline to select it. Drag any of the red arrows towards the center of the shape to create an Inner Contour. Change the number of Contour Steps to 25
and press Enter to apply the change. Move the Contour Width slider to 130 or enter the number in the text entry box and press Enter to apply the change. Press the Miter Join icon (the one that looks
like an upside down V).
If you are new to Xtreme and/or the Contour Tool, press all three Corner Join icons to see the difference each makes on the contour.
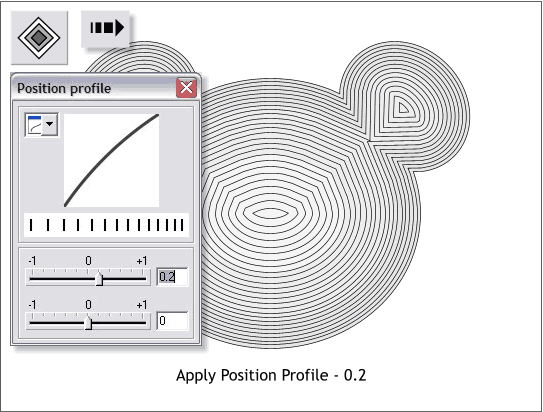
By applying a Profile setting to the contour we can achieve a more 3D contour shape. With the contour and the Contour Tool still selected, press the left of the two arrow icons on the Infobar (these are the Profile icons) to open the
Position Profile dialog (shown above).
Move the top slider to the right a little until the amount shown is 0.2. The contour rings will automatically readjust to the new setting.
Again, if you are new to Xtreme and to Profiles, move the sliders around to get an idea how they effect the contour. Xtreme has contour options for many of its tools
and they all work in much the same way. There are also 4 preset profiles in the drop down list. Select these and see what they do before finally setting the top slider as indicated.
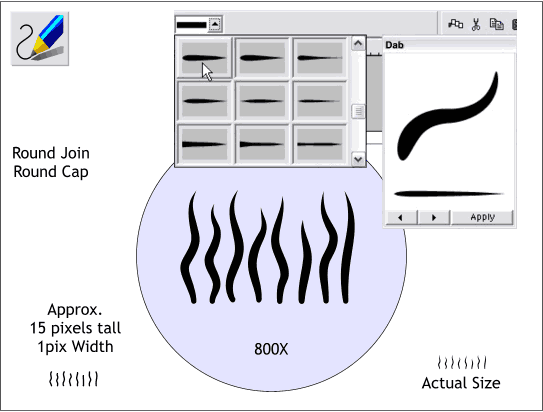
To create the fur for our bear we will begin by creating a series of fiber shapes. We can create a series of freehand lines and then use one of Xtreme's Existing Stroke Shapes to taper each fiber.
Select the Freehand and Brush Tool. Move the Smoothness slider to the left to about 20%. Draw several gently undulating (wavy) lines as shown in the
enlarged example above. The actual height of the lines should be around 15 pixels tall. Set the Line Width to 1pt.
Select the lines and then select the Freehand and Brush Tool and from the second drop down list on the Infobar (Select and Existing Stroke Shape) scroll down a few lines and select the Dab
stroke shape. The fly out menu on the right shows a larger example of the shape and lists the name in the title bar as shown in the screen shot above.
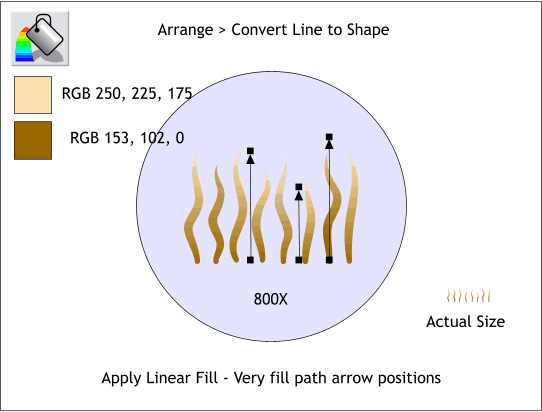
Zoom in close on the wavy lines. Select all the lines and from the Arrange menu, select Convert Line to Shape. This changes the tapered lines into shapes to which we can apply gradient fills.
Select the first shape and then select the Fill Tool. From the drop down list of Fill Types on the Infobar select Linear. Drag the ends of the fill path arrow so
that they are straight up and down. Click on either control handle (the tiny box at the ends of the arrow) and change the colors as indicated above. (Use the RGB Color Model in the Color Editor (Ctrl e
) to modify the colors to those shown above.
Copy the filled shape (Ctrl c). Marquee select all the other shapes (drag a rectangle around the shapes with the Selector Tool) and press Shift Ctrl a to
apply the attributes from the first shape to the others. Or you can select Paste Attributes from the Edit menu. Select each of the shapes individually with the Fill Tool
and vary the length of the fills as shown.
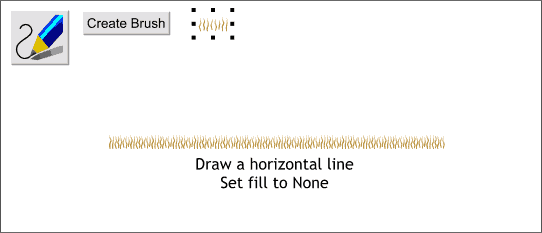
Now that we have our fibers we can create a brush. Marquee select all the fiber shapes. Select the Freehand and Brush Tool then press the Create Brush button on the Infobar. Name your brush and press OK.
NOTE: Do not group the strokes. Xtreme will create a brush alternating the individual shapes which is what we want.
Using the Freehand and Brush Tool, draw a horizontal line. The new brush stroke will be applied to the line as shown above. Click the left mouse button on
the cross hatched box to the left of the screen palette to set the fill to none.
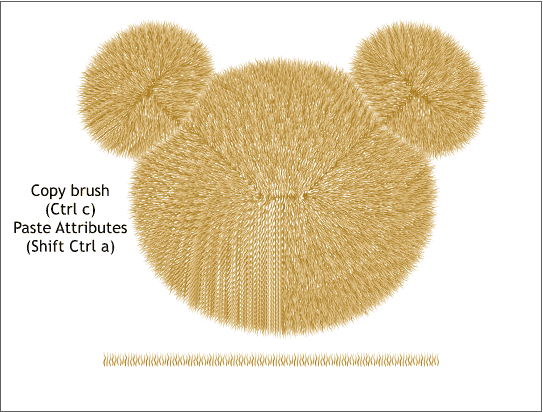
Select the brush stroked line and Copy it to the clipboard (Ctrl c).
Select the contour and from the Arrange menu, select Convert to Editable Shapes. With the contour still selected, select Ungroup (Arrange menu).
Using the Selector Tool, marquee select all the shapes in the contour and from the Edit menu, select Paste Attributes (or press Shift Ctrl a). The series of
shapes should now look like the example above.
Because each contour ring has the same brush stroke, some unfortunate and distracting patterns have occurred. We will fix this in the next step.
If you have not already done so, save your work and take a short break to rest your eyes. Looking at the screen for long periods of time is not good for your eyes. Especially if you are one of us older folks!
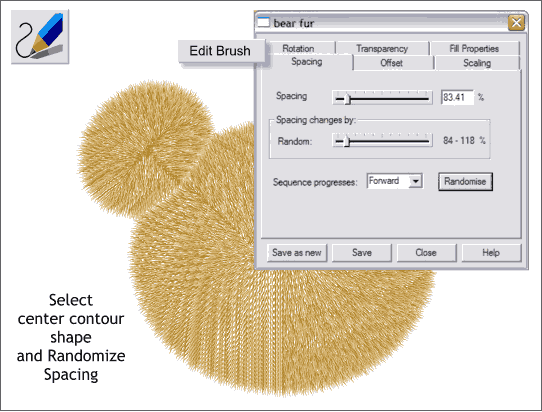
Select the Freehand and Brush Tool then click to select any of the rings of fur. I have indicated the center shape but any will do.
Press the Edit Brush button to open the Edit Brush dialog (shown above). Select the Spacing tabbed section and move the Spacing slider to around 80%
(Spacing moves the fibers closer or farther apart). Now move the Random slider to the right a little. Press Close to close the dialog.
Copy this new shape to the clipboard (Ctrl c). Select all the shapes with the Selector Tool and paste attributes (Shift Ctrl a). All the shapes will look pretty
much the same. We will change this in the next step.
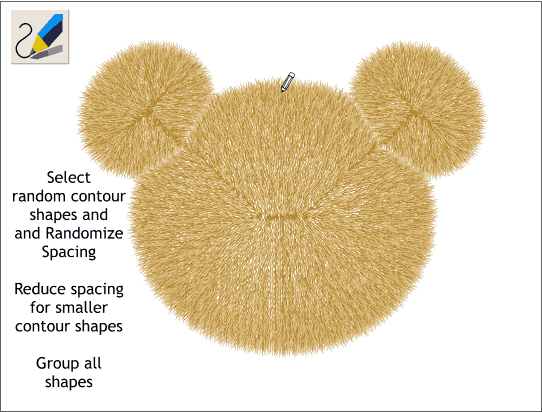
Select the Freehand and Brush Tool, select a contour ring at random then open the Edit Brush dialog. Select the Spacing tabbed section.
Working from the center outward, and using the Freehand and Brush Tool, select one of the center most contour rings and then press the Random button to alter the spacing of the fiber shapes.
Repeat this working outward from the center pressing the Random button each time. You can press the Random button once or several times. By the time you
have reached the outer most contour ring, your fur should now look evenly spaced like the example shown above.
Save your work (always a good idea to do this frequently when working with complex brush shapes) and take a short, or long, break.
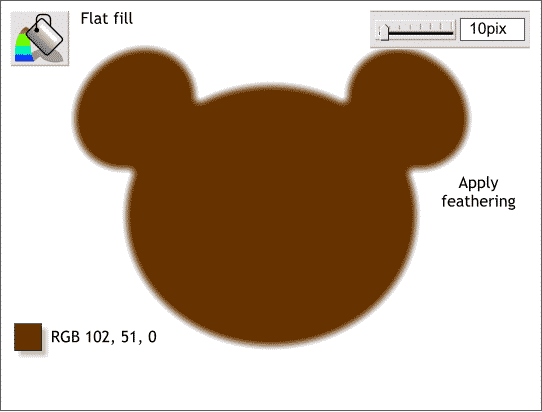
Select the outer most contour ring and duplicate it (Ctrl d). Select the Freehand and Brush Tool then from the Select an Existing Brush drop down list (to the immediate right of the Edit Brush
button) select the first line shape (Normal line).
Set the outline to none and apply a deep brown fill. Move the Feathering slider (at the top right portion of the Infobar) to 10pix. Feathering softens the edges of a shape.
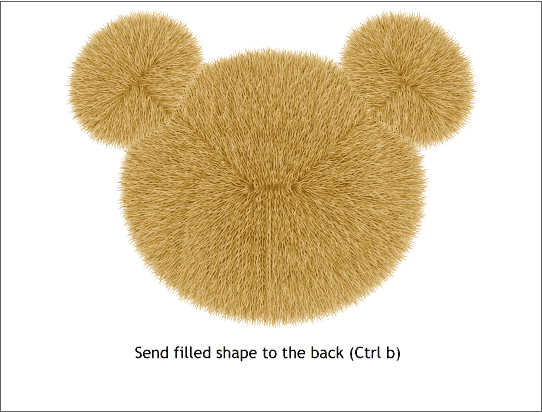
Center the feathered shape over the fur and with the shape still selected, send it to the back (Ctrl b). This minimizes the open areas.
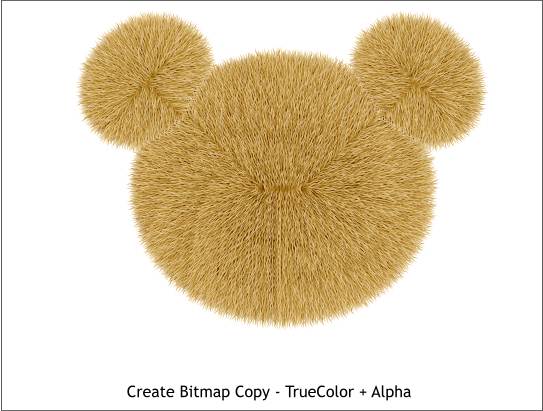
Those of you with older computers may notice that it takes a lot of time for the screen to redraw each time we modify the fur. At this point we don't need all the
individual contour rings so we will create a bitmap copy of the rings. First, though, save the fur file with another name just in case you want to alter it at some later time.
Select all the contour rings and from the Arrange menu, select Create Bitmap Copy... Use the default setting (TrueColor + Alpha). Press Create. TrueColor +
Alpha creates a bitmap image with a transparent background.
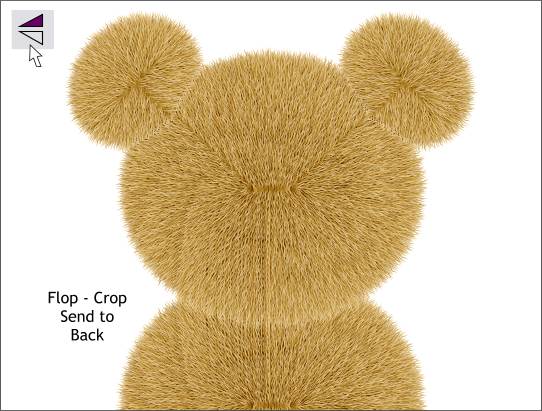
Clone the bitmap. Press the Flip Vertically icon on the Infobar. Send the clone to the back (Ctrl b) and position it as shown above.
Crop the bottom of the image by placing a rectangle that is wider than the bitmap over the bottom portion of the bitmap. Selecting both the rectangle and the bitmap, Arrange > Combine Shapes... Subtract Shapes.
NOTE: I just found this out recently but it might come in handy for you some day. Even though the cropped portion of the
bitmap is gone, in reality, it is only masked. The entire image is still there. To prove this, select the cropped bitmap then select the Shape Editor Tool. Drag
the bottom control points downward. And you will see the rest of the cropped bitmap is still there. The only way to get rid of the unused portion of the bitmap (if you want to) is to create a new bitmap copy.
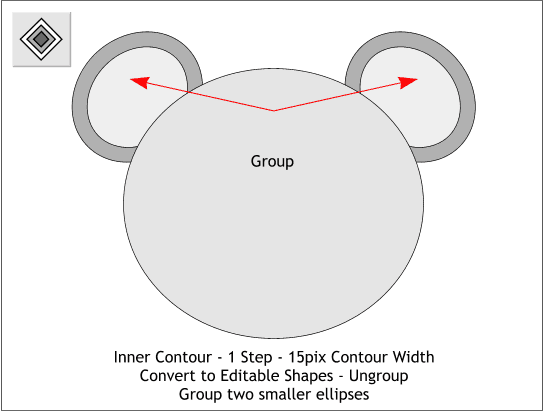
Find the original three ellipses that we set to one side early in the tutorial. Select both the ear ellipses then select the Contour Tool. Create a 1-step, Inner contour, (change the steps to 1 and press
Enter to apply the change) 15 pixels wide. Convert the contour to editable shapes (Arrange menu) and then Ungroup (Ctrl u).
Group (Ctrl g) the two smaller ellipses.
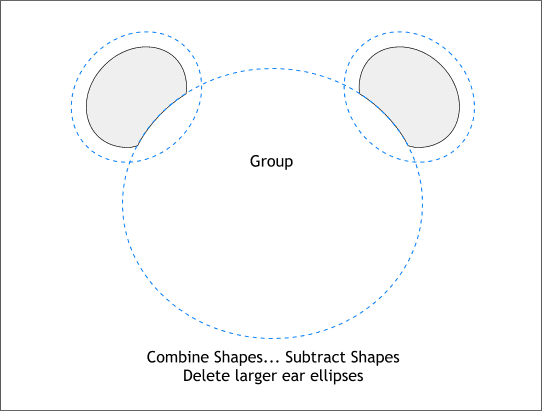
Bring the larger ellipse to the front (Ctrl f). Select the large ellipse and the grouped smaller ellipses and from the Arrange menu, select Combine Shapes... Subtract Shapes
. The result of this should be the two smaller ellipses with the area removed where the larger ellipse overlapped.
NOTE: If you do not get this result, and if only one of the smaller ellipses has an area removed, you did not convert the contour to editable shapes first.
Save your work and take an eye break.
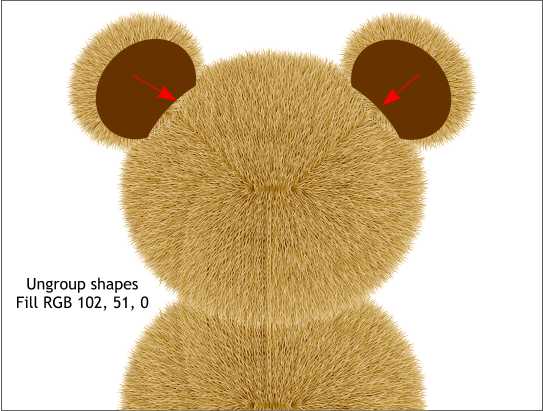
Ungroup the two shapes and apply a solid brown fill. Position the shapes over the ears and move the shapes a little bit towards the center of the head as shown.
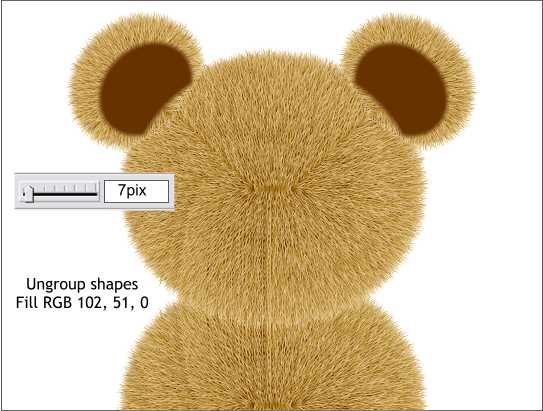
Apply 7 pixels of feathering to the two shapes to soften the edges.
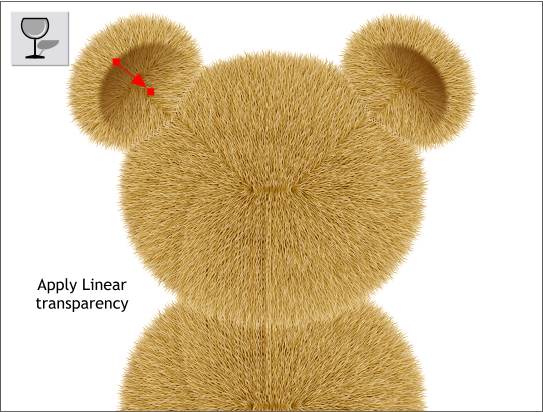
Select the Transparency Tool. Click on the left brown shape and then drag from the outside towards the center of the face. The fill path arrow should stop
before the bottom edge of the ellipse as shown. Repeat for the other shape.
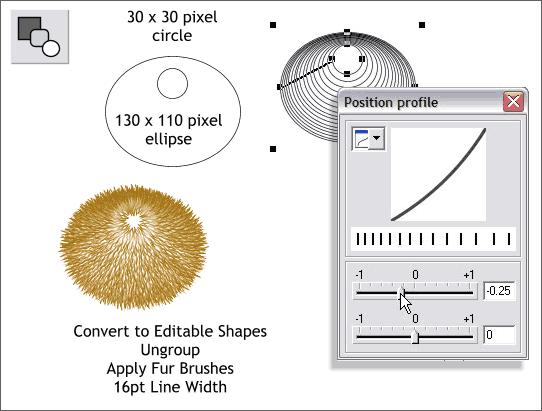
Teddy bears have nice rounded muzzles. We'll make one using almost the same technique we used to create the head except we will use a blend this time.
Start with a small circle and an ellipse to the sizes and position shown above. Select the Blend Tool. Click the larger ellipse and drag to the edge of the small circle to create a blend. Change the number of Blend Steps to
15 on the Infobar and press Enter to apply the changes.
Click the first Profile arrow on the Infobar to open the Position Profile dialog. Move the top slider in the dialog as shown.
Select the blend and Arrange > Convert to Editable Shapes. Ungroup the shapes. (Arrange menu)
With the elliptical shapes selected, open the Line Gallery (the icon with the arrow on the top right area of the Infobar. Open the New Brush Strokes folder
and select the fur brush shape. Change the size (do this first) to 16. Select the fur brush stroke and press Apply to apply the brush to the lines.
With all the ellipses selected, select the Freehand and Brush Tool. Press Edit Brush and then select the Spacing tabbed section. Move the Random slider to apply a random spacing to all ellipses.
And now select the individual ellipses and press the Random button to modify the spacing for each ellipse.
Take another short break.
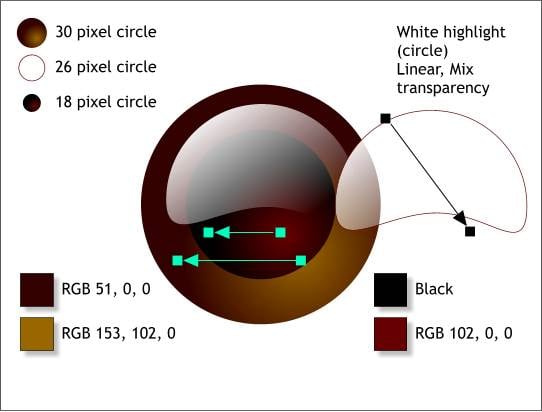
We are down the the final details. For the glass eyes create three circles to the sizes shown top left. Apply the two circular fills for the eye and the pupil.
Convert the white filled 26 pixel circle to editable shapes. Using the Shape Editor Tool, drag the bottom center control point upwards creating the white shape shown on the right. Apply a Linear, Mix
transparency by selecting the shape with the Transparency Tool, then dragging from the top left downwards and a little beyond the end of the shape. This adds a nice glassy highlight to the eye.
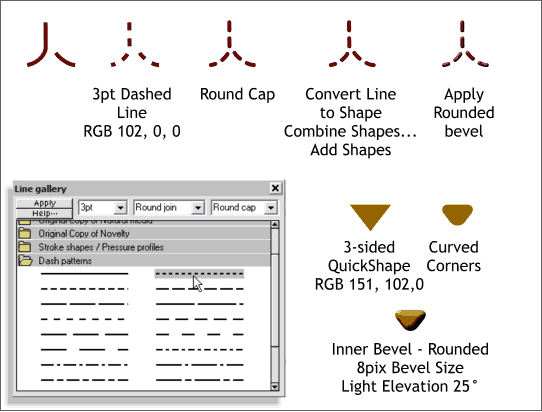
Finally we need a mouth and nose. Using the Shape Editor Tool make a J-shape about 40 pixels tall. Also make a short shape that goes in the opposite direction
of the bottom of the J-shape. Select both lines and then open the Line Gallery. Select Round Join and Round Cap from the drop down lists. Open the Dash Patterns
folder. Click the dashed line in the top position in the second column and press Apply. Highlight the line width size and change the value to 3pt. Press Apply.
Convert the two lines to shapes (Arrange menu). Then Combine Shapes... Add Shapes. Apply a Rounded, Inner Bevel to give the appearance of yarn stitching.
Using the QuickShapes Tool (just below the Ellipse Tool on the main toolbar), draw a 3-sided triangle about 40 pixels wide by 25 pixels tall. Press the Curved Corners icon on the Infobar (or double click on one of the ends with the
QuickShapes Tool.
Apply an Inner Bevel to the specifications shown above.
Save your work and take a short break. We are almost done.
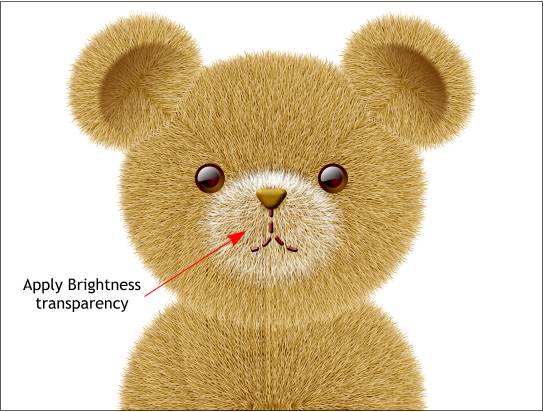
Place the muzzle fur as shown. Apply a Flat, Brightness transparency which turns the fur pale beige. Position the eyes and nose and mouth as shown. (You
will need to make a duplicate eye). Once everything is in the proper position, make a clone of the muzzle. This will let some of the nose and mouth show through while making both items look softer.
Last we need to make some spectacles so our bear can look like Harry Potter.
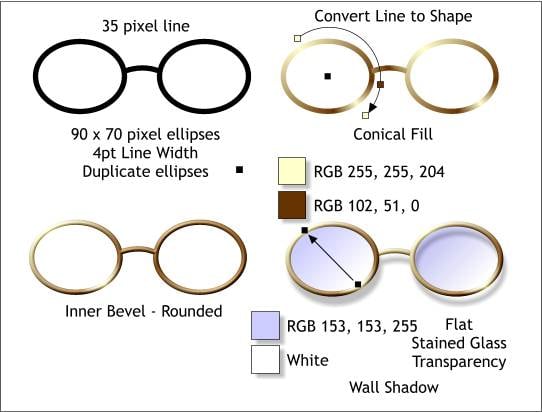
Make two ellipses to the size shown above and a horizontal line 35 pixels wide. Give all a 4pt line width and set the fill to none. Select the line with the Selector Tool then use the Shape Editor Tool
to drag the center of the line upwards into a gentle curve.
Convert the two ellipses and curved line to shape (Arrange menu).
Apply a Conical fill using the two colors shown above and drag either end point to rotate the fill path as shown. (Select Conical from the drop down list of Fill Types with the ellipse and the
Fill Tool selected). The fill begins and ends with the pale yellow. Double click at about the 4 o'clock position on the fill path to add a new color station and apply the dark brown fill to this control point.
Copy the fill (Ctrl c) and then select the other ellipse and curved line shape and Paste Attributes (Shift Ctrl a). Reposition the center of the conical fill on the
curved line object so that the point in the center does not show.
Group the three objects, then apply a Rounded, Inner Bevel.
Make two more ellipses a little bit larger than the opening of the frames. Apply a two color Linear fill using the colors shown above.
Add a Flat, Stained Glass transparency to the lenses.
Send the lenses to the back (Ctrl b). Group the lenses and frames.
Select the Shadow Tool. Click on the glasses group and drag straight down a little to add a shadow as shown above.

And here is the final image.
I have added a deep brown rectangle behind Beary and applied an Elliptical fill with the center color a light brown. I also brought the eyeballs and the nose in front of the lenses.
�2002 Gary Priester from the Xara Xone
| 
